So welcome to part 2 of the two part series project . I hope that you have read the part of this project. In this part i will explain the wiring , schematics and code for this project.
So lets get started .
I hope you have prepared the buttons by following the instructions on my previous post .
Now will wire them . Get your soldering iron and solder ready!
Wire the buttons as shown in the schematic :
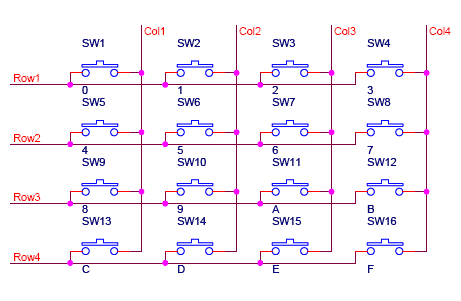 1. Wire all the anodes of the first , second , third and 4th rows together and do the same with the cathodes . As a result you will have a total of 8 wires (4 from rows and 4 from columns ). With this your most important part of build is complete – The Keyboard Matrix.!
2.Now, Take your cardboard/ MDF board / Wood sheet and paste your button arrangement on it with hot glue .
At this point of time the only part left is the electronics and code required to drive the calculator and make it usable .
Now the wiring the pins on arduino an connection the matrix .
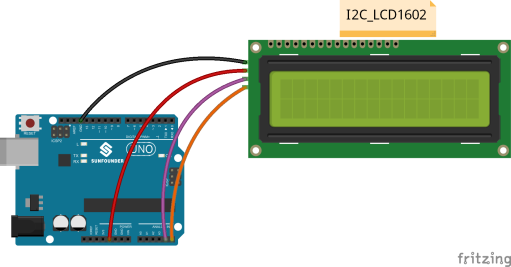
3. Connect the LCD’s SDA and SCL pin to the SCL and SDA pins of arduino (UNO : A4(SDA), A5(SCL) ; MEGA : SDA and SCL Pins).
4. Connect VCC TO Arduino’s 5v and gnd to Arduino’s ground .
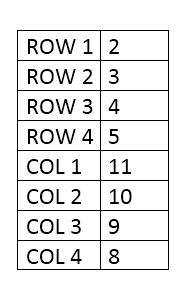
5. Now, for connecting the keypad follow this table :
After wiring the pins you are ready to upload the code !
6. So grab the sketch i made from here. Connect arduino to your PC and upload the code .
7. The layout of the buttons will be as follows :

{It is simple calculator program designed in c language . I’ve modified the code to interface with the button matrix by using the keypad matrix library .}
If everything Worked fine then you have followed all the steps correctly but if not recheck your steps or post a comment below !
Here is a video about the working project :
